Thursday, May 10, 2012

Baby Rabbit Decomposition in Time-Lapse

This young rabbit was found at my dad's doorstep several weeks ago. We believe it was killed and delivered by his cat. I had been thinking about doing a time-lapse of a decomposing animal for quite a while and figured that I would make the best of this fresh carcass. I built a box using a wooden frame and chicken wire to allow smaller animals and bugs in while keeping out the larger animals that might just drag it off.  Here is the "rot box".  Since the lid is removable to allow full sunlight, I may call it the "grow box" for future projects.
Here is the box after this project was completed with the lid open and the camera in place.


For the filming I used my new Pentax Optio WG-1 which is really durable and versatile. I started taking 1 picture every 12 minutes, but as the action sped up over the last two days I increased the frequency to once every 5 or six minutes. On the last day when I went out to check the progress, I was disappointed to see the whole rabbit was gone. There were no bones or anything left, so I thought a snake or something had gotten in and carried it off.  However, after watching the playback, I realized that the maggots had devoured the entire rabbit. I was expecting a skeleton to stay together for several weeks and had planted some grass seeds to grow up and eventually beautify the whole gory scene, but it went way faster than I expected.  The entire process took only 4 days.
 

Labels: , , , , ,

Tuesday, September 27, 2011

DIY Time-lapse Dolly

I recently purchased a Pico Dolly so I could attempt to make a self-contained time-lapse dolly that I could take anywhere.


Here is the Pico Dolly with the first step complete. I used the rim of a lid that went to an old pill container and attached it to the inside of the wheel. I had to take the wheel off and then replace it using a small hex key.


I used fishing line tied through the spokes of the wheel to attach the lid so I wouldn't damage the wheel with glue or drill holes.


Next I took 2 pieces of plywood and attached them to the dolly using 1/4 inch bolts through the predrilled standard tripod screw holes in the dolly.


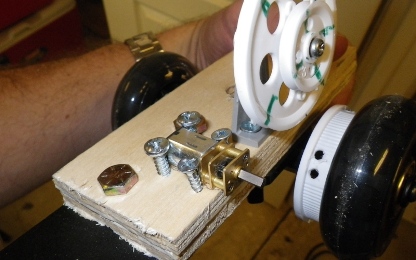
Then I attached the pulleys from a motorized pulley set from Hobby Engineering.


The miniature metal gear motor I purchased separately from Hobby Engineering came next.


Finally I connected a rubber bands to the pulleys, a battery pack, and a potentiometer to use as an on off switch and to modulate the speed a little further as needed.


Ultimately I had to attach another rim to the front wheel because I had some trouble getting traction with just one wheel and with the elasticity of the rubber band, the motion needed to be a little smoother. Here is the first video I made with this setup.


The biggest draw backs to this rig are that despite gearing down the rpms, it still moves a little too fast for most natural outdoor scenes. Also it has to be on a relatively smooth and level surface.

UDATE: 11/21/11 - Here is my second version using a chain and sprocket system


Labels: , ,

Wednesday, July 27, 2011

An Aphid Live Birth and Predation Time-lapse

I have previously posted some pictures and info on the mutualistic relationship between ants and aphids, but I hadn't really given any thought to the reproductive cycle of aphids. Neil Bromhall has made an excellent time-lapse video of aphid live birth and subsequent predation of the aphids by hoverfly larvae.


I was surprised to learn that aphids give live birth so I read the Wikipedia entry on aphid reproduction. It is far to complex and variable for me to try to summarize here. I will just say that it is quite amazing an worth a read.

Labels: , , , , , ,

Sunday, July 10, 2011

Time-lapse of the Beach in Destin, Florida

Here is a nice HD time-lapse of the beach in Destin, Florida. It was filmed by napnet a couple of months ago.


From Crabby at The Destin Sandpiper.

Labels: ,

Saturday, November 27, 2010

The Setup for the Decaying Berries Time-lapse

Click the pic to enlarge


For my recent time-lapse of a strawberry, blackberries and raspberries decomposing in a petri dish I used a Pentax Optio W90 which seems to be a great camera for shooting time-lapses. It has a built in intervalometer with lots of flexibility in settings. Also it is weather resistant and can be used outside or underwater. It has two macro settings with one of them for use at 1cm. The intervalometer function can be used with multiple settings such as auto flash and macro. To get around the camera's limited battery life, I ordered an extra Pentax D-Li88 rechargable battery that allows me to switch them out periodically and let one charge while the other is being used. Charge time is about 2 hours or less. With my setup, I attached the camera to a sturdy block, with the opening for changing batteries off to the side so I could change the battery every 3-5 days without moving the camera at all. The camera automatically took one picture every 20 minutes and it is played back at 30 frames per second. I used Quicktime Pro to make the movie from all the still shots. I made the music using Sony ACID Music Studio 7.

Labels: , , , ,

Sunday, November 14, 2010

Time-lapse of the Week #9

Here is another great time-lapse from neilbromhall of some germinating beans up close and personal and even underground.


And from mtainfo we have some interesting footage of the NYC marathon.


Since I didn't do a TLOTW last week I am posting a bonus video that I found today that is not even a time-lapse and wasn't posted during this week. It is a stop motion video with post it notes from bunliu and it is very cool.


Enjoy and have a great week!

Labels: , , , , ,

Sunday, October 31, 2010

Time-lapse of the Week #8

Since I have been preoccupied with halloween preparations, I haven't really looked for any good time-lapses to feature. Therefore I will gratuitously only show my latest time-lapse which I just posted today. It was a 39 day project. I took one picture every 30 minutes of my compost heap and it is played back at 30 fps. With this being October, halloween is the obvious theme. Enjoy.

Labels: , , , , ,

Sunday, October 24, 2010

Time-lapse of the Week #7

Wow. I almost forgot to post a TLoTW this week and I checked in on YouTube just before going to bed and I got a message from schizzecazzechea to check out this video. All I can say is freaking WOW! I just kept watching over and over and kept on smiling. This just makes me happy.

Labels: , ,

Sunday, October 17, 2010

Time-lapse of the Week #6

Here is a nice time-lapse of a corn field maze and the evening sky by YouTube user KenScottPhotography.


Of course I have to include my own time-lapse. This is part of my compost heap project. I zoomed in on the pumpkin as it breaks down over a 3 week period. One picture was taken every 30 minutes and it is played back at 30 fps. As of today the compost heap is still being filmed. I am using a Pentax Optio W90.

Labels: , , , , ,

Sunday, October 10, 2010

Time-lapse of the Week #5

Here is an unbelievable time-lapse of Fly Agaric and Phallus impudicus growing in time-lapse by neilbromhall .


Also here is some cool action with some fruit, (nectarines?) decomposing over three weeks by fookuzz:

Labels: , , , ,

Sunday, October 03, 2010

Time-lapse of the Week #4

This week's featured time-lapse is of 1 tree, 3 people, and 8 hours of cutting compressed down to 2 minutes with some nice zydeco music by Preston Frank and Family. The video was posted by brightcourse .


And now just for fun I'll throw in another great one by Jay at milapse of Keweenaw Peninsula. It is packed with some beautiful scenes. This is by far the best quality that I have seen this week but he is such a pro that I don't really count him as being in the same league as most of the others.

Labels: , ,

Thursday, September 30, 2010

Compost Camera Setup and Preview

Click the pic to enlarge


This is one of the most recent photographs of the time-lapse setup for the compost camera. I have added a small watermelon yesterday. I bought it, took a small slice from the middle, then propped it up on the rind of the part that I ate and kept the rest to eat later. The melon wasn't all that good tasting. I probably won't add much new stuff to it except actual waste because the possum you see there has been getting busy and I am not trying to attract any critters of that size. Here is the YouTube preview video of the compost heap.


Click the pic to enlarge


I am using a Pentax Optio W90 which I bought just a few weeks ago. All things considered, it seems like a great camera for shooting time-lapses. It has a built in intervalometer with lots of flexibility in settings. Also it is weather resistant and can be used underwater. It has two macro settings with one of them for use at 1cm. The intervalometer function can be used with multiple settings such as auto flash and macro. The only 2 things that I don't like about it so far are that even though I have seen statements that an A/C adapter is available, I haven't been able to find one and by looking at the camera itself, I don't see where one would even plug one in. The other thing is that even though the intervalometer can take up to 1000 pictures, the battery runs out way before that, somewhere more around the 300-350 range. I have gone around that by ordering an extra Pentax D-Li88 rechargable battery so I can switch them out each day and let one charge while the other is being used. Charge time is about 2 hours or less. I will say again though that for the price I am happy. Just be sure and download the user's manual to make sure it has the exact specs you need before buying.


Click the pic to enlarge


I built a little roof for the camera and attached the camera to the stand with a hex bolt through the back of the wood. I also placed 2 screws in the wood sticking out to stop the camera from rotating down and so that I can put it in the exact same position again if I have to take the camera off the stand.

Labels: , , , , , ,

Sunday, September 26, 2010

Time-lapse of the Week #3

Here is a nice time-lapse video of the assembly of a giraffe skeleton in the library of the Santa Rosa Junior College Petaluma campus. This was posted by ThePressDemocrat.


Also, yesterday I posted a brief video time-lapse of the compost heap in my backyard. It is just a brief preview of an ongoing project.

Labels: , , , , , ,

Saturday, September 11, 2010

Time-lapse of the Week

Here is my time-lapse that I posted on YouTube this week. It is of a small rice field being harvested. The period of filming was about 2 hours. I took a picture every 5 seconds then played them back at a rate of 30 fps.

Here is an awesome video showing the life cycle of the Sara Orange Tip Butterfly using high speed, traditional and time-lapse filming techniques from one of the best, jcmegabyte:

And here is a great one of a construction project from timelapseman:

Labels: , , , ,

Wednesday, June 09, 2010

Super Extreme Speed Painting - Amaryllis Flower


I have a new technique for painting that allows me to save time while creating beautiful works of art so watch closely and enjoy. Be sure to watch until the very end to see how this artwork really comes to life. The artwork is all original and the music was made with Sony's Acid Music Studio 7.0.

Really this is kind of just a spoof some of the speed painting videos I have seen on YouTube. It is not too hard to tell that I used the chroma key effect in making the the video, but then when the time-lapse portion of the flower starts then it is a dead give away. I just used a canvas and covered it with blue paint as evenly as possible while filming. The biggest problem was getting the paint even and trying to avoid shadows. I also should have noticed that the other room in the background was dark and shadowy and parts of it fell within the color range that I was keying out.

Labels: , , ,

Monday, May 24, 2010

I Have Been Touched by His Noodly Appendage!

I was putting together a time-lapse video of some mushrooms that I found growing in my yard when I saw a miracle. The almighty revealed himself in this video footage. I will admit that it did require the use of Sony's Vegas Movie Studio HD and a green screen to coax this miraculous event into existence. Nonetheless, it was a truly life changing and enlightening experience. The main things I learned are that He is full of noodly goodness and that if you want to make the green screen (chroma key) effect work, the lighting and color of the screen have to be perfectly even, you can't have any shadows at all.


Labels: , , , , , ,

Wednesday, May 19, 2010

Miramar Beach Time-lapse with Fisheye Lens

I made this video using a fisheye lens with my Canon Powershot S3 IS and GBTimelapse program from the balcony of our condo at Miramar Beach near Destin, Florida. I took a picture about every 20 seconds and it is played back at 30 frames per second. We were there 2-3 weeks ago, just as the oil spill was gaining press. The weather was not so nice due to rain and wind but that didn't ruin our time. The oil stayed away and so far it has not been a problem on the beaches in that area. The local authorities do seem to be making some preparations for if/when the oil moves in. Though my time-lapse video has nothing to do with the oil spill, I'm putting in a link to an animation tracking spread of the oil, since I have digressed to the subject.

Labels: , , , ,

Thursday, April 15, 2010

Cecropia Moths, Hyalophora cecropia

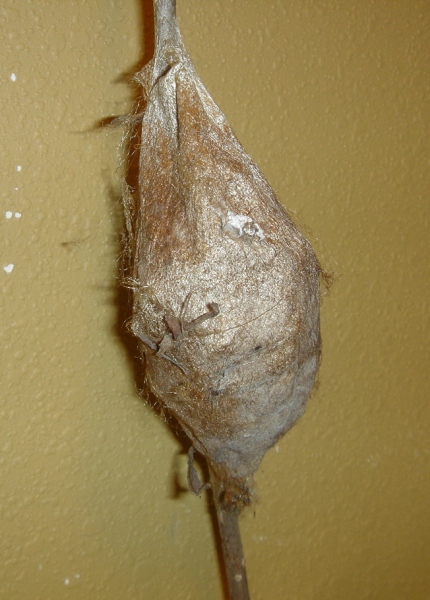
Sometime back in mid March, I was fishing at our farm's reservoir and I ran across a large cocoon. It was attached along the length of a small tree branch right on the edge of the water.


Click the pic to enlarge


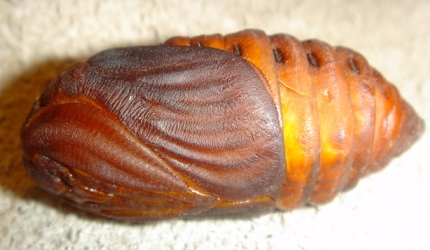
Not having any idea what was in it, I tore it open and I found this very large pupa.

Click the pic to enlarge

I brought them both home, did some research, and found with suprising ease (thanks to this expert) that these were Cecropia moth pupae. Wanting desperately to film the emergence of this moth, I set up my time-lapse rig in my gargage closet and began shooting. I suspected from my reading that it would be about 2 weeks before eclosure so I spaced the photos out to about every 5-10 minutes at first. I waited and waited and waited. after about 3 weeks I got tired of watching time-lapse videos of a moth pupa sitting still, so I added some growing soybeans into the frame and continued the filming. At this point I was shooting 1 picture every 20 minutes. I wasn't prepared for the emergence of the first moth from the intact cocoon, but it came out and sat for a while. I missed the best part of the action of the moth emerging due to the long interval between pics. I did take some great photos of the adult moth before letting it go. Here is the video showing the whole above mentioned process:


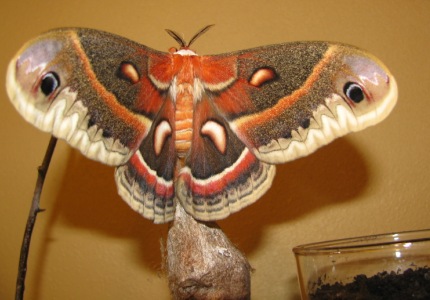
Below is a nice pic of the moth after it emerged. It had a wingspan of around 5.5 inches. Here is a large version of my best Cecropia moth photo.

Click the pic to enlarge

I then rearranged the set up for the exposed pupa and the soybeans and waited for another week or so. I was about to give up on this pupa thinking it must have died from excessive handling when, just before going to bed, I rechecked and saw the pupa moving wildly and realized she was on her way out. I rearranged the set up again for a closer view and changed to 6 second intervals then varied from 6-20 second intervals. I was unbelievably excited about getting this whole event on camera but the excitement faded a little as I realized that her wings were a little deformed and she probably wouldn't fly as the other one had. I am not sure of what caused this. The shell of the pupa remained stuck around its right wing as they unfurled and I eventually had to pull it off between frames, but it may have been too late and that may be at least partly to blame for the deformity of her wings. Here is the video of the emerging moth:


This post and many better ones are on board Modulator's Friday Ark #291 so don't forget to have a look!!

Labels: , , , , ,

Wednesday, February 10, 2010

An Amaryllis Growing, Flowering and Decaying in Time-lapse


Here is my latest time-lapse. This amaryllis was filmed over a period of 24 days. Initially I took one picture every 20 minutes, then I increased the frequency to every 15 minutes about halfway through it. I had no idea the thing was going to get so tall or take so long to flower or I would have set it up differently. As you can see I had to adjust the location of the plant and camera several times, there were even a couple of sequences that I just left out because they stayed in the frame so briefly. I used a Canon PowerShot S3 IS along with my laptop using GBTimelapse software to control the camera and I used Quicktime Pro to make the movie from the still shots.

Labels: , ,

Thursday, November 12, 2009

Dandelion Clock Opening and Flower Closing, Time-lapse


Here is my most recent time-lapse project. I started by digging up a small chunk of my yard containing this dandelion and placing it in a bowl. Then I set up my Canon PowerShot S3 IS overhead attached to my laptop using GBTimelapse software to control the camera. I originally set it to shoot a pic every 30 seconds but when played back at 30 frames per second, it was too slow and the file size was too large. So I used every 3rd picture making it 1 picture per 90 seconds played back at 30 fps. I used Quicktime Pro to make the movie from the still shots.

Labels: , , ,